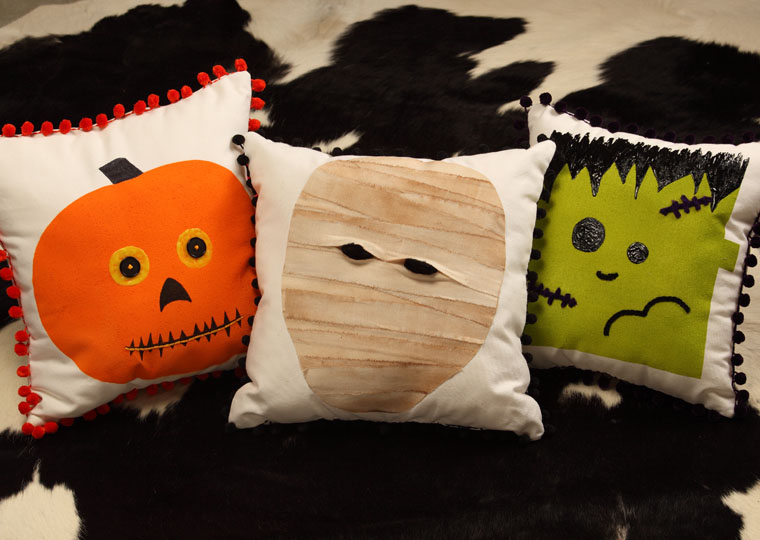
Easy Stencils Create Color Blocks to Embellish Into Halloween Characters and Muslin Fabric Strips are Quickly Mummified.
SHOPPING LIST
JACK-O- LATERN PILLOW
1/2 yd natural duck cloth
1 3/4 yd orange ball fringe
Cream thread
Polyester stuffing or pillow form
Poster board
Exacto knife
Thick black Sharpie pen
Yellow glow dimensional paint
2 black button
Golden yellow embroidery floss
Embroidery needle
Scissors
MUMMY PILLOW
Design Master Glossy Wood Tone 757
1/2 yd natural duck cloth
1- 3/4 yd black ball fringe
Cream thread
Polyester stuffing or pillow form
1/2 yd muslin
Double stick fuseable web
4 large black pom poms
Scissors
Iron
MONSTER PILLOW
Design Master Olive Bright 790
1/2 yd natural duck cloth
1-3/4 yd purple ball fringe
Cream thread
Polyester stuffing or pillow form
Masking tape
Black dimensional fabric paint
Purple wireless chenille
Embroidery needle
Scissors
TECHNIQUE
JACK -O- LATERN PILLOW
- Cut two 17″ squares from the duck cloth.
- On a 18-20″ square of poster board sketch a pumpkin shape, sizing it to fit within a 15″ square. Cut out the shape with an exacto knife to create a stencil.
- Ready a flat painting area and protect from overspray with newspaper. Lay 1 piece of fabric on newspaper then place the pumpkin stencil centered on top of fabric. Ensure all fabric edges are masked.
- Make sure the edges of the pumpkin stencil are flush to the fabric. If not, weight the poster board down with weights such as rocks. Spray a light coat of Orange within the stencil. Let dry and reapply 1 or 2 more coats. Let thoroughly dry.
- With the black Sharpie draw a stem, nose and jagged mouth. Fill in as needed.
- Make large circles for eyes using the Yellow Glow dimensional paint. Let dry.
- Attach black buttons with embroidery floss and highlight mouth with chain stitching.
- Allowing for a 1/2″ seam allowance, sew ball fringe to right side of painted fabric square. Place right sides of fabric together and stitch, leaving an 8″ opening. Turn fabric inside out and stuff pillow. Stitch opening closed.
MUMMY PILLOW
- Cut two 17″ squares from the duck cloth.
- Tear muslin into 1-1/4″ strips. Spraying from approx. 18″, mist the strips with Glossy Wood Tone. Irregularly spray some areas heavier than others. Let dry.
- Iron the muslin strips.
- To make an iron-on transfer of the mummy face, lay strips of the muslin in a slightly irregular fashion on a 15″ square of fuse-able web. Keeping in mind a rough shape of the head, cut a short strip for the top of the head and adhere/iron to webbing. Cut a second strip and place it next to the first slightly overlapping the edges. Fuse in place. Cut the next strip slightly longer and fuse in place next to the previous strip with one side crossing over the previous one. Repeat this process, alternating placement of strips, to create the full head. In areas where fabric overlaps place a small piece of webbing and fuse loose strip down.
- Sketch the outline of a mummy head on fabric and cut out the shape.
- To make eyes, glue 2 pom poms together on fabric for each eye. Fuse a strip of webbing to 2 strips of muslin. Place strips over eyes in an overlapping fashion and fuse into place. Trim length of strips.
- Place mummy transfer on 1 piece of pillow fabric and fuse into place.
- Allowing for a 1/2″ seam allowance, sew ball fringe to right side of pillow square. Place right sides of fabric together and stitch, leaving an 8″ opening. Turn fabric inside out and stuff pillow. Stitch opening closed.
MONSTER PILLOW
- Cut two 17″ squares from the duck cloth.
- With masking tape create a basic 14″ square outline on the right-side of one fabric square. Tape off area for protruding knobs. Mask remaining exposed fabric edges with tape.
- Ready a flat painting area and protect from overspray with newspaper.
- Ensure all taped edges are adhered to fabric edges. Spray a light coat of Olive Bright on exposed fabric. Let dry and reapply 1 or 2 more coats. Let thoroughly dry.
- With the black dimensional paint draw the hair, hairline and eyes on face. Fill in as needed. Let dry.
- Thread needle with purple chenille and stitch into fabric creating the nose, mouth and scars.
- Allowing for a 1/2″ seam allowance, sew ball fringe to right side of painted fabric square. Place right sides of fabric together and stitch, leaving an 8″ opening. Turn fabric inside out and stuff pillow. Stitch opening closed.