A Guide to Spray Techniques — Floral Products

Spray color goes beyond the bloom. From satin ribbons to silk flowers, ceramic planters to glass vases — Design Master® sprays give you the power to customize nearly every element of your design. Add a soft tint, bold accent, or complete color transformation to non-perishable floral materials, uniting every element with artistic cohesion and endless creative potential.

General Application Tips

Preparation Tips for Containers

Application Tips for Ribbon

Application Tips for Styrofoam™

General Application Tips

  • Always use in a well-ventilated area.
  • Read and follow the directions and cautions on each product.
  • Shake the can well, before and between uses.
  • Point the nozzle toward the black dot on can rim to access all of contents.
  • For general application, hold the can 12-15 in / 30-38 cm from the surface.
  • Use even, parallel stroke to apply spray.
  • OverLAP each pass slightly for smooth, even coverage.
  • Begin and end each spray pass off of the object. For best results, start at the base and move up.
  • Let the mist fall onto your work for light, even coverage. Build color gradually or blend colors by layering light coats.
  • Test sprays on extra materials or on an inconspicuous place to assure desired results.

Preparation Tips for Spraying Containers

When preparing to spray hard-surface items, these two tools can make application easier: 1. Use a Turntable or Lazy Susan: Place the item on an inexpensive lazy susan or turntable. Hold the spray can in one hand and slowly rotate the turntable with the other, bringing each unsprayed section toward you. Continue rotating until all visible areas are evenly coated. 2. Contain Overspray with a Cardboard Box: To help manage overspray during application or in windy conditions, place the item inside a cardboard box laid on its side. The box should be roughly twice the size of the item, with one end open and the item positioned near the opening. For even easier spraying, place the item on a turntable, as described above.

Application Tips for Ribbon

To customize ribbon color, these two processes make it easy:
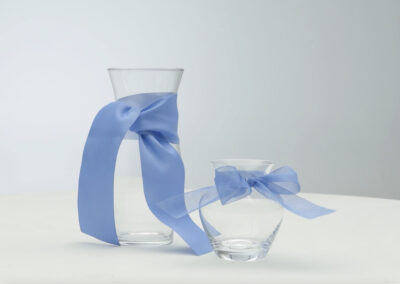
Basic Application
From 12-15 in / 30-38 cm away, apply one or two light, even coats of color to ribbon. Let it dry, then examine the ribbon. Sometimes color on one side of the ribbon is enough. If desired, lightly apply color to backside of the ribbon.

If the treated ribbon feels slightly stiff, pull the ribbon through your fingers several times or use an iron to soften it.
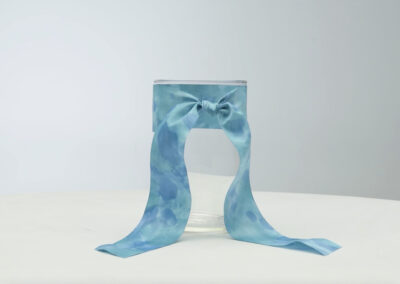
Watercolor Ribbon
Choose 2-3 spray colors to blend together. Wear protective disposable gloves. Randomly fold or loosely ball a length of white satin ribbon into the palm of your hand. From close range, spray the first color into the ribbon ball. Turn it around in your hand and spray any remaining white areas.

Unfold the ribbon to reveal random spots of color. Repeat the folding and spraying process with a second color, paying special attention to areas that remain uncolored. As color is added, use your fingers to rub the wet color into the other to blend. Repeat with a third color, if desired.

For smoother color transitions, mist the ribbon with a transparent dye spray or alternatively dampen the ribbon with acetone nail polish remover. Rub sections between your fingers to blend colors. Any aroma will evaporate as it dries. If the treated ribbon feels slightly stiff, pull the ribbon through your fingers several times or use an iron to soften the ribbon.

You can also use pre-colored satin ribbon that coordinates with your selected color combination.

Application Tips for Styrofoam™

Use Design Master® ColorTool Spray to safely color Styrofoam™ brand foam. This product line includes 4 metallic colors — Antique Gold, Brilliant Gold, Brilliant Silver, Copper — that safely color the foam in a metallic hue. Avoid using Premium Metals sprays — they are not formulated for foam.

  1. Follow the general recommendations on the can label.
  2. Hold can upright 15-18 in / 38-45 cm from the surface, and spray in even, parallel strokes. Apply several light coats, allowing each coat to dry before adding another. Do not allow the surface to become too wet with color.

NOTE: Avoid spraying closer than the recommended distance. Be patient — the light coats dry quickly to allow additional coats to be applied.

More Resources

Now that you’ve learned the basics of applying Design Master spray colors on floral products, explore our other helpful guides to learn about expert techniques to confidently manipulate and enhance the natural beauty of fresh blooms and the foundational principles of color shifting and color theory to understand color relationships and create harmonious palettes.

A Guide to Spray Techniques — Fresh Flowers

Applying Design Master® spray colors on fresh flowers requires special techniques for safe application. Follow these practices for best results.

A Guide to Color Shifting

Insights into color selection and the effective practices for achieving desired shifts of flower color – putting color control in your hands.

A Guide to Color Theory

Understanding color principles is foundational for impactful floral design, selling color to customers, and creating controlled color adjustments

Explore More Topics

No results found.